
Buckeyes, those irresistible little morsels of peanut butter and chocolate, hold a special place in the hearts of many, especially during the holidays or while watching a big game. I am absolutely delighted to share with you today the ultimate recipe for these iconic no-bake treats that are as fun to make as they are to eat. Prepare yourself for a journey into pure, sweet indulgence!
A Sweet Taste of Midwestern Tradition
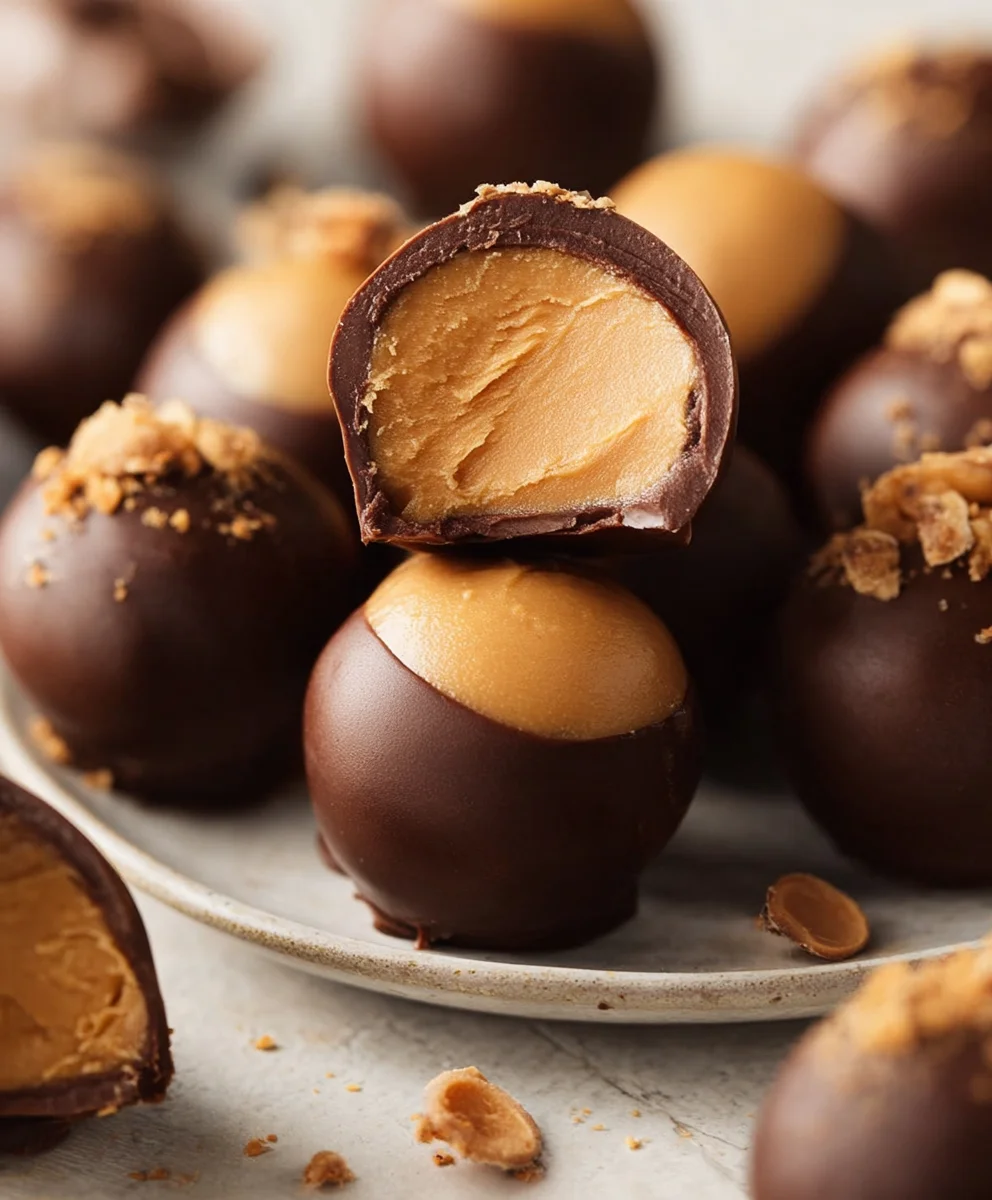
Originally popularized in Ohio, the name and distinctive appearance of these candies cleverly mimic the shiny, dark brown nut of the Ohio buckeye tree, complete with its lighter ‘eye’. This clever visual connection isn’t just a coincidence; it’s a nod to a deeply cherished state symbol, making these candies more than just a dessert—they’re a cultural emblem. The simple elegance and profound nostalgia associated with Buckeyes make them a beloved staple.
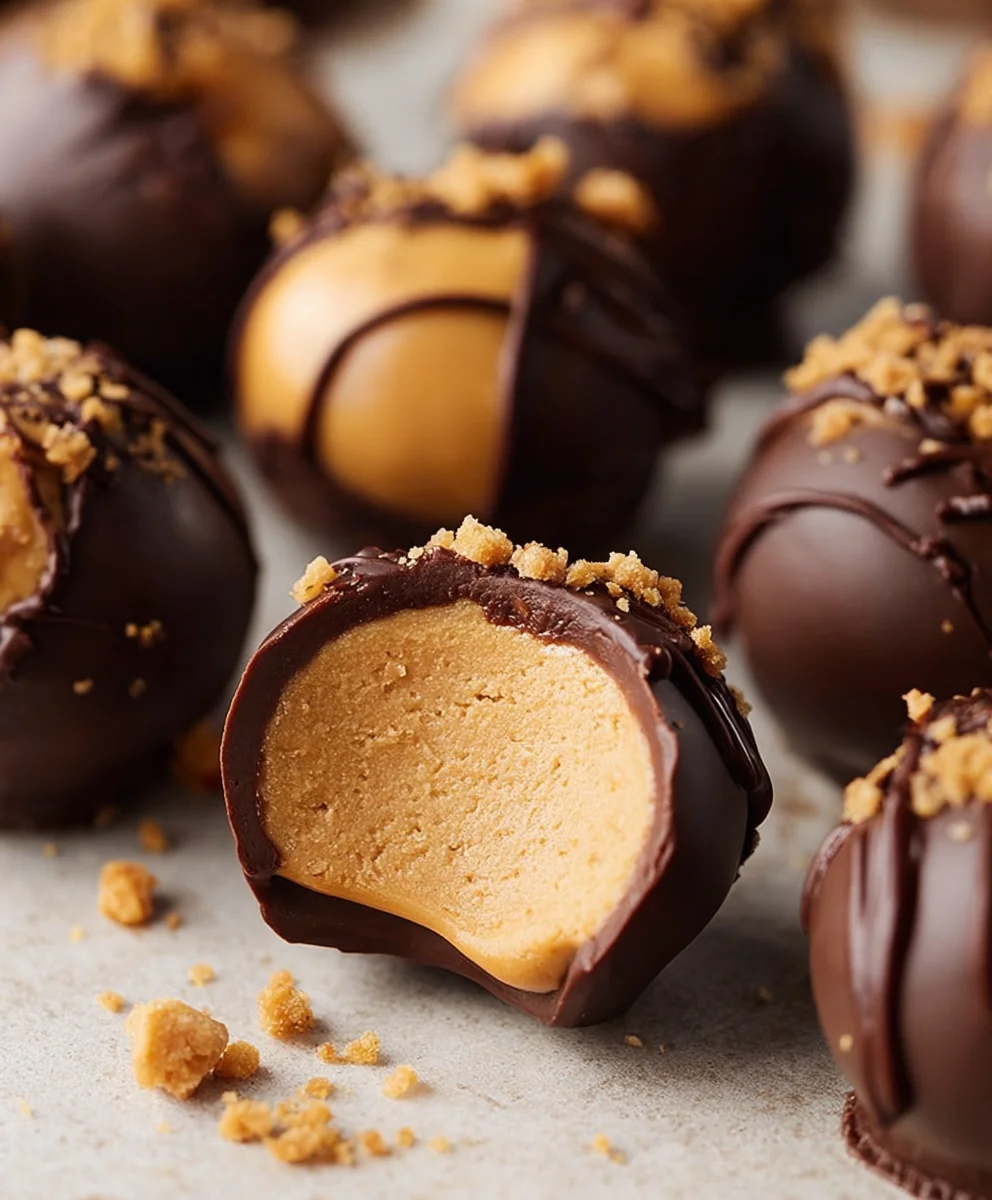
People adore these treats for their perfect balance of creamy, sweet peanut butter filling enveloped in a rich, dark chocolate coating. The contrast in textures and the timeless flavor combination make them utterly addictive and incredibly simple to prepare, requiring no baking at all. Whether you’re a lifelong fan or new to their charm, you’ll soon understand why these delightful Buckeyes disappear so quickly from any dessert platter!

Ingredients:
- For the Peanut Butter Filling:
- 1 ½ cups (3 sticks or 340g) unsalted butter, completely softened to room temperature. This is crucial for a smooth, creamy texture in your Buckeyes.
- 1 ½ cups (about 380g) creamy peanut butter. I always opt for a good quality, shelf-stable creamy peanut butter like Jif or Skippy for consistent results. Natural peanut butter can be too oily and might change the texture.
- 4-5 cups (480-600g) powdered sugar (confectioners’ sugar), sifted. I start with 4 cups and add more if needed to achieve the perfect consistency. Sifting prevents lumps, making your Buckeyes incredibly smooth.
- 2 teaspoons pure vanilla extract. Don’t skimp on the vanilla; it adds a wonderful depth of flavor to the peanut butter.
- For the Chocolate Coating:
- 12 ounces (about 2 cups) good quality semi-sweet chocolate chips or chopped semi-sweet baking chocolate. I find chocolate chips melt smoothly, but a good quality baking bar chopped finely works beautifully too.
- ½ cup (about 85g) milk chocolate chips (optional, but I love the slight contrast in flavor and color it brings to my Buckeyes).
- 1 ½ tablespoons solid vegetable shortening (like Crisco) or refined coconut oil. This is my secret weapon for creating a silky-smooth, dippable chocolate coating that sets up nicely without being too brittle.
- Equipment You’ll Need:
- Large mixing bowl
- Electric stand mixer with paddle attachment or a hand mixer
- Rubber spatula
- Measuring cups and spoons
- Sifter (for powdered sugar)
- Baking sheets
- Parchment paper or silicone baking mats
- Small cookie scoop (about 1-tablespoon size)
- Toothpicks
- A deep, microwave-safe bowl or a double boiler setup for melting chocolate
- A small, sturdy fork or dipping tools (optional, but helpful for removing excess chocolate)
Making the Perfect Peanut Butter Filling for Your Buckeyes
This is where the magic begins for our beloved Buckeyes! Getting the peanut butter mixture just right is key to success. You want it to be firm enough to roll into balls but still wonderfully creamy and melt-in-your-mouth.
- Prepare Your Ingredients: Before you even think about turning on your mixer, make sure your unsalted butter is genuinely at room temperature. I mean, truly soft. If it’s too cold, it won’t cream properly with the peanut butter, and you’ll end up with a lumpy, inconsistent filling. Take it out of the fridge at least an hour or two before you plan to start, or even longer if your kitchen is cool.
- Cream the Butter and Peanut Butter: In the large bowl of your electric stand mixer, fitted with the paddle attachment, combine the softened butter and the creamy peanut butter. Beat them together on medium speed for about 2-3 minutes, or until the mixture is incredibly light, fluffy, and well-combined. This step is vital for achieving that smooth, irresistible texture in your Buckeyes. Scrape down the sides of the bowl periodically with your rubber spatula to ensure everything is incorporated evenly. We’re aiming for a consistency that looks almost like a very thick, pale frosting.
- Gradually Add Powdered Sugar: With the mixer on low speed, begin adding the sifted powdered sugar, one cup at a time. The reason I suggest sifting is to prevent any stubborn lumps from making their way into your filling. Trust me, biting into a lump of raw powdered sugar is not the Buckeye experience we’re going for! After each addition, wait for the sugar to be mostly incorporated before adding the next cup.
- Incorporate Vanilla Extract: Once you’ve added about 3-4 cups of the powdered sugar, add the pure vanilla extract. Continue mixing on low speed until the vanilla is fully distributed and the mixture starts to come together into a thick, somewhat crumbly dough.
- Check and Adjust Consistency: Now, this is where your judgment comes in. The ideal consistency for your Buckeyes’ peanut butter filling is like a very stiff dough that you can easily roll into a ball without it crumbling or being too sticky. It should hold its shape. If your mixture feels too soft or sticky, gradually add the remaining powdered sugar, a tablespoon at a time, until it reaches the desired firmness. If, by some chance, it feels too dry and crumbly (this usually only happens if you added too much sugar or your butter wasn’t soft enough), you can add a tiny bit more softened butter or even a teaspoon of milk to bring it together, but be careful not to make it too wet.
- Chill the Filling: Once you’re happy with the consistency, remove the bowl from the mixer. Cover it tightly with plastic wrap and transfer it to the refrigerator. Chill the peanut butter filling for at least 30 minutes to 1 hour. This chilling time is absolutely essential! It makes the mixture much easier to handle and roll, preventing it from sticking to your hands and ensuring your Buckeyes hold their shape beautifully. Don’t skip this step!
Shaping Your Buckeyes
Now comes the fun part: transforming that delicious peanut butter dough into perfectly uniform balls, ready for their chocolate bath. Consistency in size here will help ensure even dipping and a professional look for your homemade Buckeyes.
- Prepare Your Workspace: While the peanut butter filling is chilling, line two large baking sheets with parchment paper or silicone baking mats. This will prevent your Buckeyes from sticking and make cleanup a breeze after dipping.
- Scoop and Roll: Remove the chilled peanut butter mixture from the refrigerator. Using a small cookie scoop (I prefer one that holds about 1 tablespoon of dough), scoop out uniform portions. Roll each portion between the palms of your hands to form smooth, round balls, about 1-inch in diameter.
- Create the “Eye” Hole: As you roll each ball, gently insert a toothpick into the top center of the ball, but don’t push it all the way through. You want to create a small indentation, a little pilot hole, that will serve as the “eye” of your Buckeye and will be used later for dipping. Leave the toothpick in for now if you prefer, or remove it and place the ball on your prepared baking sheet. I usually remove the toothpick after making the hole and then insert a fresh one when I’m ready to dip, ensuring a clean “eye” for each Buckeye.
- Arrange and Chill Again: Place the rolled peanut butter balls with their “eye” holes on the prepared baking sheets, leaving a little space between each one. Once all the peanut butter mixture has been rolled, transfer the baking sheets back to the refrigerator. Chill the peanut butter balls for another 30-45 minutes. This second chilling phase is just as important as the first; it ensures the balls are very firm, which makes dipping much easier and helps them maintain their shape perfectly when introduced to the warm chocolate.
Melting the Silky Chocolate Coating
The chocolate coating is the crown jewel of our Buckeyes. Melting it correctly is paramount to achieving a smooth, glossy finish that sets beautifully. We want a chocolate that’s easy to dip into and doesn’t seize or become clumpy.
- Prepare for Melting: While your peanut butter balls are chilling for the second time, it’s time to get the chocolate ready. You have a couple of excellent options for melting chocolate, and I’ll walk you through both.
- Double Boiler Method (My Preferred Method for Control):
- Fill a saucepan with about 1-2 inches of water and bring it to a simmer over medium-low heat.
- Place a heatproof bowl (make sure it’s larger than the saucepan’s opening so it sits securely on top without touching the water) over the simmering water.
- Add the semi-sweet chocolate chips (and milk chocolate chips if using) and the solid vegetable shortening or refined coconut oil to the bowl.
- Allow the chocolate to melt slowly, stirring occasionally with a rubber spatula, until it’s completely smooth and glossy. The gentle indirect heat of the double boiler prevents the chocolate from scorching and gives you excellent control over the melting process.
- Important Tip: Make sure no water or steam gets into the chocolate, as even a tiny drop can cause it to “seize” and become thick, grainy, and unusable. Keep the heat low and stir patiently.
- Microwave Method (Quicker, but Requires More Attention):
- Place the semi-sweet chocolate chips (and milk chocolate chips if using) and the solid vegetable shortening or refined coconut oil in a deep, microwave-safe bowl.
- Microwave on medium power (50%) for 30-second intervals, stirring thoroughly after each interval. Chocolate retains its shape even when melted, so it’s crucial to stir to see its true consistency.
- Continue microwaving and stirring until the chocolate is almost completely melted, with just a few small lumps remaining. Remove it from the microwave and continue stirring until the residual heat melts the remaining lumps and the mixture is completely smooth and glossy.
- Caution: Overheating chocolate in the microwave is easy to do and can cause it to burn or seize. Always go low and slow.
- Maintain Ideal Temperature: Once your chocolate is beautifully melted and smooth, keep it warm. If using the double boiler, you can leave it over the warm water (off the heat) or transfer it to a small slow cooker on the “warm” setting. If using the microwave method, you might need to pop it back in for 10-15 seconds on low power if it starts to thicken too much during dipping. The shortening or coconut oil is essential here; it helps the chocolate remain fluid for dipping and gives the Buckeyes a lovely, slightly soft bite when the chocolate sets, rather than a brittle snap.
Dipping Your Buckeyes into Decadent Chocolate
This is where your Buckeyes truly come to life! Dipping requires a little patience and a steady hand, but the results are incredibly rewarding.
- Set Up Your Dipping Station: Retrieve your firm, chilled peanut butter balls from the refrigerator. Have your melted chocolate ready and warm. Make sure you have your parchment-lined baking sheets close by for placing the dipped Buckeyes.
- The Toothpick Method: Insert a fresh toothpick into the pre-made hole on top of one peanut butter ball. Hold the toothpick firmly.
- Dip with Precision: Carefully lower the peanut butter ball into the melted chocolate. Dip it almost all the way, leaving a small circle of peanut butter visible at the top around the toothpick. This exposed peanut butter is the characteristic “eye” that gives Buckeyes their name! Swirl it gently to ensure even coating.
- Remove Excess Chocolate: Lift the Buckeye out of the chocolate, allowing any excess to drip back into the bowl. You can gently tap the toothpick against the rim of the bowl or use a small, sturdy fork (or another toothpick) to scrape off any drips from the bottom of the Buckeye. This helps create a neat, clean edge.
- Place on Baking Sheet: Carefully transfer the dipped Buckeye to your parchment-lined baking sheet. While still holding the toothpick, gently twist and pull the toothpick straight up and out. You’ll be left with a small hole.
- Smooth the Top: Immediately after removing the toothpick, use your fingertip or a clean toothpick to lightly smooth over the tiny hole left by the toothpick. Don’t worry if it’s not perfectly flush; it adds to the rustic charm of homemade Buckeyes.
- Repeat for All Buckeyes: Continue this dipping process with the remaining peanut butter balls, working efficiently to keep the chocolate at an optimal temperature and the peanut butter balls firm. If your peanut butter balls start to soften too much while you’re dipping, pop the baking sheet back into the fridge for a few minutes to firm them up again. This will prevent them from falling off the toothpick or losing their shape.
Setting and Storing Your Delicious Buckeyes
The final steps ensure your Buckeyes are perfectly set and ready to be enjoyed, and that they stay fresh for as long as possible!
- Chill to Set: Once all your Buckeyes have been dipped, place the baking sheets back into the refrigerator. Chill for at least 30 minutes, or until the chocolate is completely set and firm to the touch. This waiting period is crucial; it allows the chocolate to harden and fully adhere to the peanut butter filling, preventing any smudging or sticky situations.
- Storage Instructions: Once fully set, your beautiful Buckeyes are ready to be devoured! To store them, transfer them to an airtight container.
- Room Temperature: If your kitchen isn’t too warm (below 70°F or 21°C), Buckeyes can be stored at room temperature for up to a week. Layer them with parchment paper between layers to prevent them from sticking together.
- Refrigerator: For longer storage, or if your home is on the warmer side, store Buckeyes in an airtight container in the refrigerator for up to 2-3 weeks. Let them come to room temperature for about 15-20 minutes before serving for the best texture and flavor. The chocolate and peanut butter will be softer and more flavorful when not super cold.
- Freezer: Buckeyes freeze wonderfully! Place them in an airtight freezer-safe container, again with parchment paper between layers, and they will keep well for up to 3 months. Thaw them in the refrigerator overnight or at room temperature for a couple of hours before serving.
- Enjoy Your Hard Work: Now, take a moment to admire your handiwork. These homemade Buckeyes are not just a treat; they’re a labor of love that brings smiles and joy. They are perfect for holiday platters, party desserts, or just a delightful indulgence for yourself. I absolutely love sharing my Buckeyes with friends and family; they always disappear so quickly!
Troubleshooting Tips for Your Buckeyes Journey:
- Crumbly Peanut Butter Filling: This usually means your butter wasn’t soft enough, or you added too much powdered sugar. Try adding a tiny bit more softened butter, a teaspoon at a time, and mix thoroughly until it comes together.
- Sticky Peanut Butter Filling: Not enough powdered sugar, or maybe your peanut butter was too oily. Add more sifted powdered sugar, a tablespoon at a time, until it reaches a firm, rollable consistency. Chilling for longer also helps immensely.
- Seized Chocolate: This is when chocolate becomes thick, lumpy, and unusable, usually due to overheating or getting water into it. Unfortunately, once chocolate seizes, it’s very difficult to salvage. Your best bet is to discard it and start fresh, being extra careful with temperature and moisture.
- Chocolate Too Thick for Dipping: This can happen if your chocolate cools down too much. Gently reheat it using your chosen method (double boiler or short microwave bursts). Adding a tiny bit more shortening or refined coconut oil (half a teaspoon at a time) can also help thin it out without compromising the setting.
- Buckeyes Falling Off Toothpick While Dipping: This is a sign that your peanut butter balls aren’t cold enough. Stop dipping, place them back in the fridge for a good 15-20 minutes, and then resume. Firmly chilled balls are much more cooperative!
There you have it! A comprehensive guide to making the most incredible homemade Buckeyes. With these detailed steps and tips, you’re well on your way to creating a batch of these irresistible peanut butter and chocolate treats that everyone will adore. Happy baking, and enjoy every single bite of your perfect Buckeyes!
Conclusion:
And there you have it! We’ve journeyed through the simple steps to create a truly irresistible treat, and I hope you’re feeling as excited as I am about the prospect of sinking your teeth into these homemade delights. This isn’t just another recipe; it’s a gateway to creating joy, whether you’re a seasoned baker or just dipping your toes into the world of confectionery. What makes this particular recipe an absolute must-try, you ask? Well, it’s the magical combination of effortlessness and sheer deliciousness. You achieve a professional-level dessert with minimal fuss, making it perfect for those moments when you crave something extraordinary without the culinary marathon. The creamy, rich center perfectly complemented by the crisp, decadent chocolate coating creates a symphony of textures and flavors that is genuinely unforgettable. It’s a crowd-pleaser guaranteed to bring smiles, spark conversations, and perhaps even earn you a reputation as the neighborhood’s resident dessert wizard.
Now that you’ve mastered the art of creating these delectable morsels, let’s talk about how to present and enjoy them. While they are certainly wonderful straight from the fridge, consider arranging them elegantly on a serving platter for your next gathering. A simple white platter allows their beautiful, distinctive shape to truly shine. For an extra touch of charm, you could place each one in a mini fluted paper cup—perfect for parties and easy handling. They make an exceptional addition to any holiday dessert spread, from Christmas cookie platters to Easter brunches, or even as a sophisticated treat for a game day get-together. Pair them with a strong cup of coffee for an afternoon pick-me-up, a tall glass of cold milk for a comforting snack, or get truly indulgent by crumbling a few over a scoop of vanilla bean ice cream for a delightful twist on a sundae. The possibilities for enjoyment are as endless as your imagination!
But why stop at the classic? This recipe, while perfect as is, also offers a fantastic canvas for your creative culinary experiments. If you’re a fan of darker chocolate, feel free to switch out the semi-sweet for a bittersweet variety, adding a deeper, more intense cocoa note that beautifully contrasts the sweet peanut butter filling. For those with a sweet tooth, milk chocolate will deliver an even more indulgent experience. Imagine adding a tiny pinch of sea salt to the peanut butter mixture to really make the flavors pop, or sprinkling a few flaky sea salt crystals on top of the still-wet chocolate for a gourmet touch. You could even swirl in a teaspoon of espresso powder into your melted chocolate for an intriguing depth of flavor. For a fun visual twist, consider dipping some in white chocolate and drizzling with colored sprinkles for a festive look. Or, if you’re adventurous, try substituting the peanut butter with almond butter or cashew butter for a slightly different, yet equally delicious, nut-filled treat. These variations allow you to personalize your batch, catering to different tastes and occasions.
Your Homemade Buckeyes Await!
I truly hope I’ve inspired you to roll up your sleeves and give this recipe a try. There’s an immense satisfaction that comes from creating something so delicious from scratch, and I promise you, the smiles and compliments you’ll receive will make every moment worthwhile. Don’t be intimidated; the process is incredibly forgiving, and the results are consistently spectacular. These aren’t just candy; they’re tiny bundles of happiness waiting to be shared. Once you taste the perfect balance of creamy peanut butter and rich chocolate, you’ll understand why these homemade Buckeyes are so incredibly addictive and why they disappear so quickly from any platter they grace.
Share Your Culinary Adventures!
I absolutely cannot wait to hear about your experience! Please don’t hesitate to dive in, enjoy the process, and savor every single bite. I would love for you to share your creations, your triumphs, and any clever variations you come up with. The best part of cooking and baking is connecting over shared experiences and inspiring one another. So, go ahead, gather your ingredients, clear your counter, and get ready to make some magic. Happy baking, and happy eating!
Classic Buckeyes Recipe: Easy No-Bake Peanut Butter Treats
Irresistible no-bake peanut butter and chocolate treats, a Midwestern tradition perfect for holidays or game day. These easy Buckeyes feature a creamy peanut butter filling dipped in rich chocolate.
Ingredients
-
1/2 cup unsalted butter, softened
-
2 cups creamy peanut butter, not natural
-
1 teaspoon vanilla extract
-
4 cups confectioners sugar, sifted
-
1/4 teaspoon sea salt
-
12 ounces semi-sweet chocolate chips
-
11.5 ounces milk chocolate chips
-
1 tablespoon coconut oil or vegetable shortening
Instructions
-
Step 1
In a large bowl with an electric mixer, beat the softened butter and creamy peanut butter for 2-3 minutes until light and fluffy. Scrape down the sides of the bowl. -
Step 2
Gradually add the sifted confectioners sugar, vanilla extract, and sea salt on low speed. Mix until a thick, stiff dough forms that can be easily rolled into balls. Adjust with more sugar if too sticky. -
Step 3
Cover the peanut butter mixture and chill in the refrigerator for at least 30 minutes to 1 hour to firm up, which makes it easier to handle. -
Step 4
Line two baking sheets with parchment paper. Using a 1-tablespoon cookie scoop, portion the chilled peanut butter mixture and roll each portion into a smooth, 1-inch round ball. -
Step 5
Gently insert a toothpick into the top center of each ball to create a small indentation (the ‘eye’). Place balls on the prepared baking sheets and chill for another 30-45 minutes until very firm. -
Step 6
Using a double boiler or microwave (in 30-second intervals, stirring after each), melt the semi-sweet chocolate chips, milk chocolate chips, and coconut oil (or vegetable shortening) until completely smooth and glossy. Keep warm for dipping. -
Step 7
Insert a fresh toothpick into a chilled peanut butter ball. Dip the ball almost entirely into the melted chocolate, leaving a small circle of peanut butter visible at the top (the ‘eye’). Tap off any excess chocolate. -
Step 8
Carefully place the dipped Buckeye on the parchment-lined baking sheet. Gently twist and pull the toothpick straight out, then lightly smooth the small hole with your fingertip. Repeat for all remaining Buckeyes, re-chilling the peanut butter balls if they become too soft. -
Step 9
Once all Buckeyes are dipped, return the baking sheets to the refrigerator. Chill for at least 30 minutes, or until the chocolate coating is completely set and firm to the touch. -
Step 10
Once set, transfer Buckeyes to an airtight container. Store at room temperature for up to 1 week, in the refrigerator for 2-3 weeks, or freeze for up to 3 months. For best texture and flavor, serve at room temperature.
Important Information
Nutrition Facts (Per Serving)
It is important to consider this information as approximate and not to use it as definitive health advice.
Allergy Information
Please check ingredients for potential allergens and consult a health professional if in doubt.
Leave a Comment