
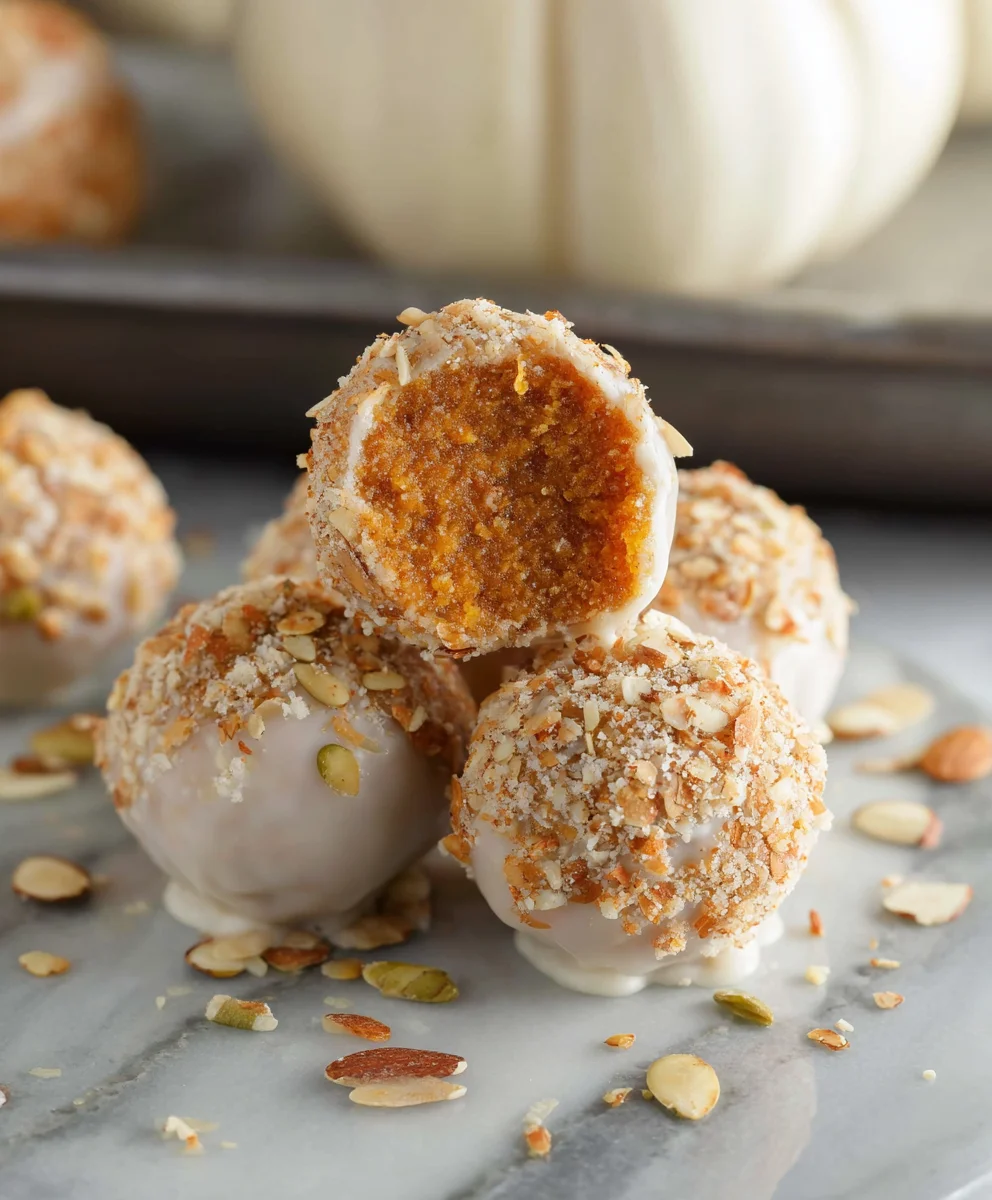
No Bake Pumpkin Pie Balls are here to revolutionize your autumn dessert game! Imagine capturing all the comforting, spiced essence of a classic pumpkin pie, but in a delightful, bite-sized form that requires absolutely no oven time. I truly believe this recipe is a game-changer for anyone who loves the taste of fall but dreads the holiday baking marathon.
While traditional pumpkin pie holds a cherished place in our hearts and on our Thanksgiving tables, signifying warmth and togetherness for centuries, these ingenious little treats offer a modern, hassle-free twist. People adore these because they deliver that authentic pumpkin spice flavor and creamy texture we all crave, without the fuss. They’re incredibly convenient to whip up, perfect for last-minute gatherings, a thoughtful homemade gift, or simply an indulgent snack on a cozy evening. Each one of these marvelous No Bake Pumpkin Pie Balls is a little burst of autumnal joy, making them an instant crowd-pleaser and a new family favorite!

Ingredients:
- 8 ounces (226g) cream cheese, full-fat: It’s really important for your cream cheese to be completely softened to room temperature. This isn’t just a suggestion; it genuinely makes a massive difference in achieving a smooth, lump-free mixture, which is the cornerstone of perfect “No Bake Pumpkin Pie Balls.” I usually take mine out of the fridge at least an hour, sometimes two, before I plan to start mixing.
- 1 cup (240g) pumpkin puree: Make sure you’re grabbing plain pumpkin puree, not the pre-spiced pumpkin pie filling. The latter already has sugar and spices, which would throw off our carefully balanced flavor profile. We want to control the spice and sweetness ourselves for these delightful “No Bake Pumpkin Pie Balls.”
- 2 cups (240g) powdered sugar (confectioners’ sugar), divided: This sweetens our mixture beautifully and contributes to the smooth, melt-in-your-mouth texture. We’ll use most of it in the dough and reserve some for one of our coating options.
- 2 cups (240g) finely crushed graham cracker crumbs: You can buy these pre-crushed, or do it yourself by processing whole graham crackers in a food processor until they resemble fine sand. They act as a wonderful binder and lend that classic pie crust flavor to our “No Bake Pumpkin Pie Balls.”
- 2 teaspoons pumpkin pie spice: This blend is the heart and soul of our pumpkin flavor! It typically includes cinnamon, nutmeg, ginger, and cloves. If you don’t have a pre-made blend, you can approximate it with 1.5 teaspoons ground cinnamon, 1/4 teaspoon ground nutmeg, 1/4 teaspoon ground ginger, and a tiny pinch of ground cloves.
- 1 teaspoon vanilla extract: A good quality vanilla extract enhances all the other flavors and adds a beautiful aromatic depth to our “No Bake Pumpkin Pie Balls.”
- Pinch of salt: Just a tiny pinch, about 1/8 teaspoon, helps to balance the sweetness and really makes the pumpkin and spice flavors pop. Don’t skip it!
- Optional Coatings (choose one or a variety!):
- 1/2 cup (60g) powdered sugar: Simply for dusting, creating a delicate, sweet exterior.
- 1/2 cup (100g) granulated sugar mixed with 1 tablespoon ground cinnamon: This classic cinnamon-sugar coating provides a lovely textural contrast and an extra layer of warm spice.
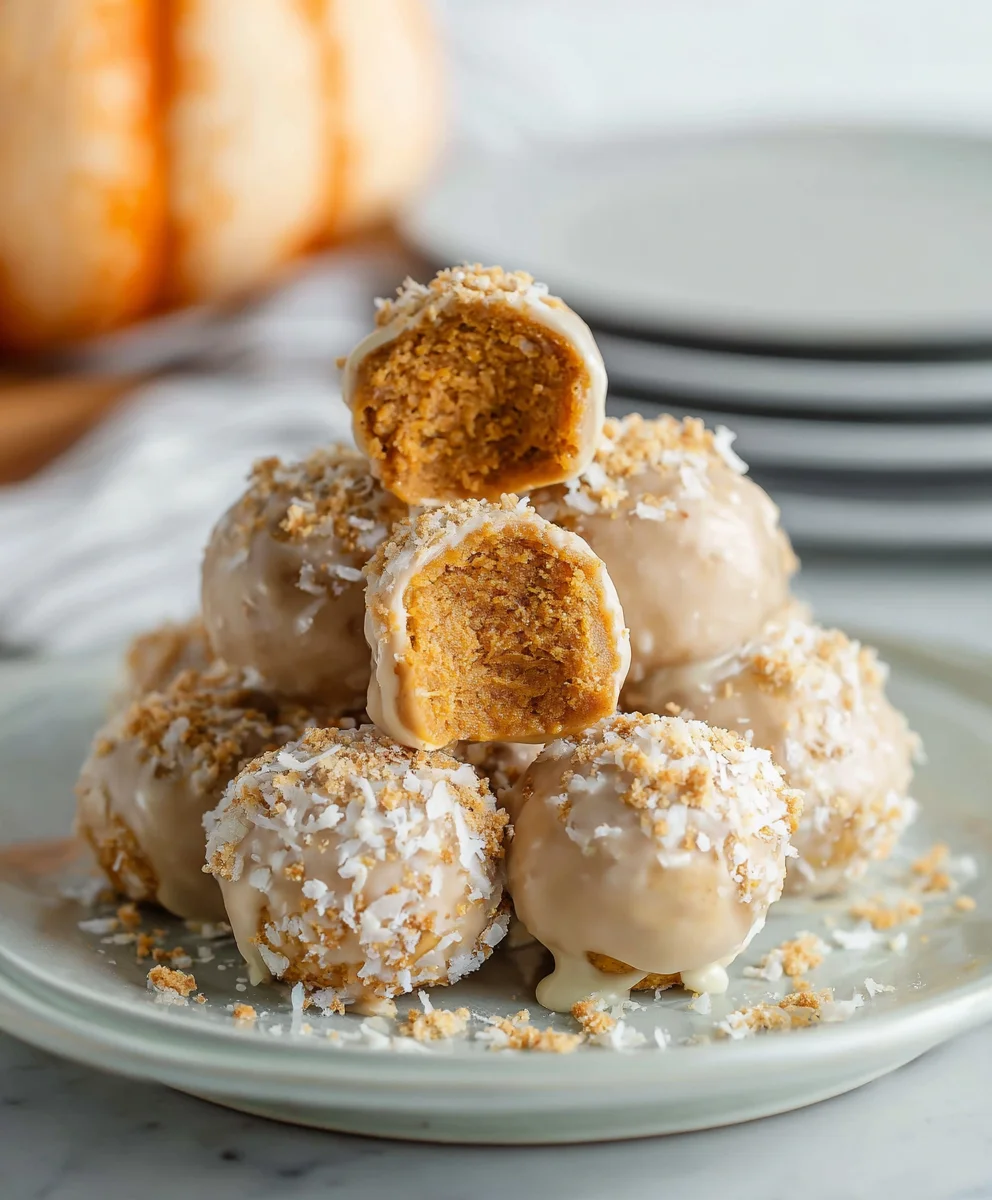
- 1 cup (170g) melted white chocolate or candy melts: For an extra decadent touch! Make sure to use good quality chocolate that melts smoothly.
- 1/2 cup finely chopped pecans or walnuts: If you love a nutty crunch, these are a fantastic option, adding both texture and flavor.
Equipment You’ll Need:
- Large mixing bowl: Essential for combining all your ingredients comfortably without spills. I always opt for one with a bit of extra space to avoid any mess when mixing.
- Electric mixer (handheld or stand mixer): While you can do this by hand, an electric mixer will make quick work of creaming the softened cream cheese and ensure a super smooth, uniform base for your “No Bake Pumpkin Pie Balls.” This really is my secret weapon for a light and airy texture.
- Rubber spatula: Perfect for scraping down the sides of your bowl, ensuring all ingredients are fully incorporated, and for gently folding in the graham cracker crumbs.
- Measuring cups and spoons: Accuracy is key in baking, even in no-bake recipes! Having a full set will ensure your ratios are spot on.
- Small cookie scoop (1-inch or 2-tablespoon size): This is incredibly helpful for portioning out uniform “No Bake Pumpkin Pie Balls,” making them consistent in size and appearance. If you don’t have one, two spoons will work, but a scoop makes it so much easier!
- Baking sheet(s): You’ll need at least one, possibly two, lined with parchment paper or a silicone baking mat. This provides a non-stick surface for chilling your rolled balls and makes clean-up a breeze.
- Parchment paper or silicone baking mats: Crucial for preventing sticking and allowing your “No Bake Pumpkin Pie Balls” to chill and set properly without any fuss.
- Shallow bowls or plates: You’ll need a few of these if you’re offering multiple coating options for your “No Bake Pumpkin Pie Balls.”
- Optional: Food processor: If you’re crushing your own graham crackers or nuts, a food processor makes this task incredibly quick and efficient, ensuring a fine, consistent crumb.
Preparing Your Delicious No Bake Pumpkin Pie Balls:
Phase 1: Gathering and Mixing the Core Ingredients
- Prepare your cream cheese: First things first, ensure your 8 ounces of full-fat cream cheese is completely softened to room temperature. This step truly cannot be rushed! If it’s even slightly cold, you’ll end up with lumps, and we want a velvety smooth base for our “No Bake Pumpkin Pie Balls.” Once it’s soft, place it into your large mixing bowl.
- Cream the cream cheese: Using your electric mixer on medium speed, beat the softened cream cheese for about 1-2 minutes until it’s super smooth and fluffy. Scrape down the sides of the bowl with your rubber spatula occasionally to ensure everything gets incorporated. You’re looking for a texture that’s light and airy, almost whipped. This aeration makes a noticeable difference in the final texture of your “No Bake Pumpkin Pie Balls.”
- Add the pumpkin puree and vanilla: Now, add the 1 cup of plain pumpkin puree and the 1 teaspoon of vanilla extract to the creamed cheese. Mix on low speed initially to combine, then increase to medium until the mixture is fully incorporated and smooth. Again, scrape down the sides of the bowl. We’re building layers of flavor and smoothness here for our “No Bake Pumpkin Pie Balls.”
- Introduce the powdered sugar and spices: Gradually add 1 and 3/4 cups of the powdered sugar (reserving 1/4 cup for a potential coating later), the 2 teaspoons of pumpkin pie spice, and that tiny pinch of salt to the pumpkin mixture. I like to add the powdered sugar in two additions to avoid a huge cloud of sugar dust! Mix on low speed until just combined, then increase to medium and beat until the mixture is wonderfully smooth and lump-free. It should be thick and creamy at this point, smelling absolutely divine with all those pumpkin pie spices. This is the heart of our “No Bake Pumpkin Pie Balls” flavor!
- Incorporate the graham cracker crumbs: Now for the binder! Add the 2 cups of finely crushed graham cracker crumbs to your pumpkin mixture. Switch to a low speed on your mixer, or better yet, use your rubber spatula to fold them in by hand. You want to mix until the crumbs are just fully incorporated and no dry spots remain. Be careful not to overmix here. The mixture should be quite thick and pliable, almost like a soft dough. If it seems a little too sticky, you can add another tablespoon or two of graham cracker crumbs, but remember it will firm up significantly during chilling. This step is crucial for the structure of your “No Bake Pumpkin Pie Balls.”
Phase 2: Chilling for Perfection
- Prepare for chilling: Once your mixture is thoroughly combined and looks like a cohesive, thick pumpkin dough, cover the bowl tightly with plastic wrap. This prevents any surface drying or absorption of fridge odors.
- Chill the mixture thoroughly: This is a non-negotiable step for successful “No Bake Pumpkin Pie Balls.” Place the covered bowl in the refrigerator for at least 2 hours. I often chill mine for 3-4 hours, or even overnight, especially if I’m preparing them for a party the next day. The chilling time allows the graham cracker crumbs to fully absorb the moisture, resulting in a firm, easy-to-handle mixture that won’t stick to your hands when you roll it. It also solidifies the fats in the cream cheese, making the balls hold their shape beautifully. Patience here pays off tremendously for perfectly formed “No Bake Pumpkin Pie Balls.”
Phase 3: Rolling and Coating Your No Bake Pumpkin Pie Balls
- Prepare your coating stations: While your pumpkin mixture is chilling, or just before you pull it out, set up your coating stations. If you’re using powdered sugar, pour 1/2 cup into a shallow bowl. For cinnamon sugar, combine 1/2 cup granulated sugar with 1 tablespoon ground cinnamon in another shallow bowl. If you’re using melted white chocolate, have your melting apparatus ready, and if using nuts, finely chop them and spread them on a plate. Having everything ready will make the rolling process seamless and mess-free.
- Prepare your baking sheets: Line one or two baking sheets with parchment paper or silicone baking mats. This is where your finished “No Bake Pumpkin Pie Balls” will rest and chill further.
- Scoop and roll: Remove the chilled pumpkin mixture from the refrigerator. It should be quite firm now. Using a small cookie scoop (about 1 to 1.5 inches in diameter, or 2 tablespoons), scoop out portions of the mixture. Gently roll each portion between the palms of your hands to form smooth, uniform balls. The chilling makes this process incredibly easy, as the mixture should not be sticky. If your hands start to get a bit sticky, you can rinse them with cold water and dry thoroughly, or even lightly dust them with a tiny bit of powdered sugar. Aim for consistency in size for the best presentation of your “No Bake Pumpkin Pie Balls.”
- Coat your balls: Immediately after rolling each ball, drop it into your chosen coating. Gently roll the ball around in the powdered sugar, cinnamon sugar, or chopped nuts until it’s completely covered. If using melted white chocolate, you can dip the balls using a fork, allowing excess chocolate to drip off, and then place them on the prepared baking sheet. For a truly decadent finish on your “No Bake Pumpkin Pie Balls” with white chocolate, you can even drizzle a contrasting chocolate over them once the white chocolate has set. Place the coated balls onto your prepared parchment-lined baking sheets, making sure they don’t touch each other.
Phase 4: The Final Chill and Serving Suggestions
- Final chill: Once all your “No Bake Pumpkin Pie Balls” are rolled and coated, return the baking sheets to the refrigerator for at least 30 minutes, or until the coatings are set and the balls are firm. This final chill is essential, especially for those coated in chocolate, to ensure everything holds together perfectly and reaches that ideal chilled dessert consistency.
- Serving your “No Bake Pumpkin Pie Balls”: These delightful treats are best served chilled. Arrange them beautifully on a platter for your guests. They are perfect as a bite-sized dessert after a meal, an elegant addition to a holiday dessert table, or a simple, satisfying snack with a cup of coffee or tea. Their rich, spiced flavor truly encapsulates the essence of pumpkin pie, without any baking!
- Storage: Store any leftover “No Bake Pumpkin Pie Balls” in an airtight container in the refrigerator. They will keep beautifully for up to 5-7 days. If you’ve coated them in chocolate, it’s particularly important to keep them chilled to prevent the chocolate from softening too much. You can also freeze these for longer storage; simply place them in a single layer on a baking sheet to freeze solid, then transfer them to a freezer-safe bag or container for up to 1 month. Thaw them in the refrigerator before serving for a wonderful treat any time!
- Variations and Customizations: Don’t be afraid to get creative with your “No Bake Pumpkin Pie Balls”! You could try adding a tiny hint of maple extract to the mixture for a maple-pumpkin flavor. For an extra kick, a very small amount of finely grated fresh ginger or orange zest can really brighten the flavors. You might also consider crushing different types of cookies for the binder, like gingersnaps or shortbread, though this would subtly change the flavor profile. The beauty of these “No Bake Pumpkin Pie Balls” is their versatility and how easily they can be adapted to your personal taste preferences. Enjoy experimenting and making them your own!
Conclusion:
So, there you have it – the secret to autumn bliss, simplified and ready for your enjoyment! I truly believe this recipe for our delightful No Bake Pumpkin Pie Balls is an absolute game-changer, and it’s destined to become a staple in your seasonal repertoire. What makes it such a standout, you ask? Well, first and foremost, the sheer ease of preparation is unparalleled. Forget preheating ovens, rolling out finicky crusts, or worrying about cracks and soggy bottoms. This recipe delivers all the iconic, comforting flavors of a classic pumpkin pie, but with absolutely none of the fuss. You’ll be amazed at how quickly you can whip up a batch, transforming simple ingredients into something truly extraordinary. The combination of creamy pumpkin, warm spices like cinnamon, nutmeg, and ginger, all perfectly balanced, creates an irresistible bite-sized treat. Each ball is a burst of autumn, offering that familiar, nostalgic taste we all crave when the leaves start to turn. They’re wonderfully moist, rich, and utterly satisfying, striking the perfect balance between a dense cake pop and a soft cookie. This isn’t just another dessert; it’s a convenient, crowd-pleasing marvel that brings joy without the usual kitchen stress. Whether you’re a seasoned baker or a complete novice, these pumpkin pie balls are incredibly forgiving and always turn out perfectly. They embody convenience without compromising on flavor, making them ideal for busy weeknights, last-minute gatherings, or simply when you need a quick, delicious pick-me-up. Trust me, once you try them, you’ll wonder how you ever lived without these little spheres of pumpkin perfection!
Now that you’ve mastered the art of these incredible treats, let’s talk about how to truly make them shine and cater to every palate. While fantastic on their own, these pumpkin pie balls are incredibly versatile. I love serving them alongside a steaming mug of coffee or a spiced chai latte – the flavors just complement each other so beautifully, especially on a crisp fall afternoon. For a festive touch, arrange them artfully on a dessert platter for holiday gatherings; they’re always the first to disappear! You could even package a small batch in a cute box tied with a ribbon for a thoughtful homemade gift that’s sure to impress. Speaking of variations, don’t be shy about experimenting! I often get creative with the coatings. While a simple dusting of powdered sugar or a sprinkle of extra cinnamon is lovely, consider rolling some in finely chopped pecans or walnuts for an added textural crunch and nutty flavor. A dip in melted white chocolate, perhaps drizzled with a contrasting dark chocolate, elevates them to an even more gourmet level, making them truly show-stopping. Toasted shredded coconut also makes for a delightful, tropical-inspired twist that offers a lovely chewiness. If you’re feeling extra indulgent, a tiny dollop of whipped cream or a sprinkle of mini chocolate chips on top just before serving takes them over the edge. For those with dietary considerations, you can often adapt the base recipe – think gluten-free graham crackers or a dairy-free cream cheese alternative – to ensure everyone can enjoy these amazing bites. They keep wonderfully in an airtight container in the refrigerator for up to a week, making them perfect for meal prep or enjoying throughout your busy schedule.
So, what are you waiting for? I wholeheartedly encourage you to roll up your sleeves and give these utterly delightful No Bake Pumpkin Pie Balls a try this season. I promise you won’t regret it! They are so much fun to make, incredibly delicious to eat, and an absolute joy to share. There’s something truly satisfying about creating such a wonderful treat with so little effort, especially when the end result is this spectacularly tasty. Once you experience the magic of these bite-sized pumpkin wonders, I’d be absolutely thrilled to hear about your experience. Did you try a unique coating? Did your family rave about them? I love seeing your creations and hearing your stories! Please don’t hesitate to share your thoughts, tips, and especially your photos in the comments below or on social media. Let’s spread the pumpkin joy far and wide. Happy creating, and happy eating!
No Bake Pumpkin Pie Balls
Revolutionize your autumn dessert game with these No Bake Pumpkin Pie Balls! Capturing the comforting, spiced essence of classic pumpkin pie in a delightful, bite-sized form, these treats require no oven time. Perfect for last-minute gatherings or an indulgent snack.
Ingredients
-
1 (9-inch) baked and chilled pumpkin pie
-
1 (16 ounce) package vanilla candy coating or almond bark
Instructions
-
Step 1
Crumble the chilled 9-inch pumpkin pie into fine crumbs in a large bowl. -
Step 2
Roll the pie mixture into 1-inch balls. Place them on a parchment-lined baking sheet. -
Step 3
Chill the pie balls in the refrigerator for at least 30 minutes to firm up. -
Step 4
Melt the 16-ounce package of vanilla candy coating or almond bark according to package directions. -
Step 5
Dip each chilled ball into the melted coating, allowing excess to drip off. Return to the parchment-lined baking sheet. -
Step 6
Chill again for at least 15 minutes, or until the coating is fully set. -
Step 7
Serve chilled. Store leftovers in an airtight container in the refrigerator.
Important Information
Nutrition Facts (Per Serving)
It is important to consider this information as approximate and not to use it as definitive health advice.
Allergy Information
Please check ingredients for potential allergens and consult a health professional if in doubt.
Leave a Comment