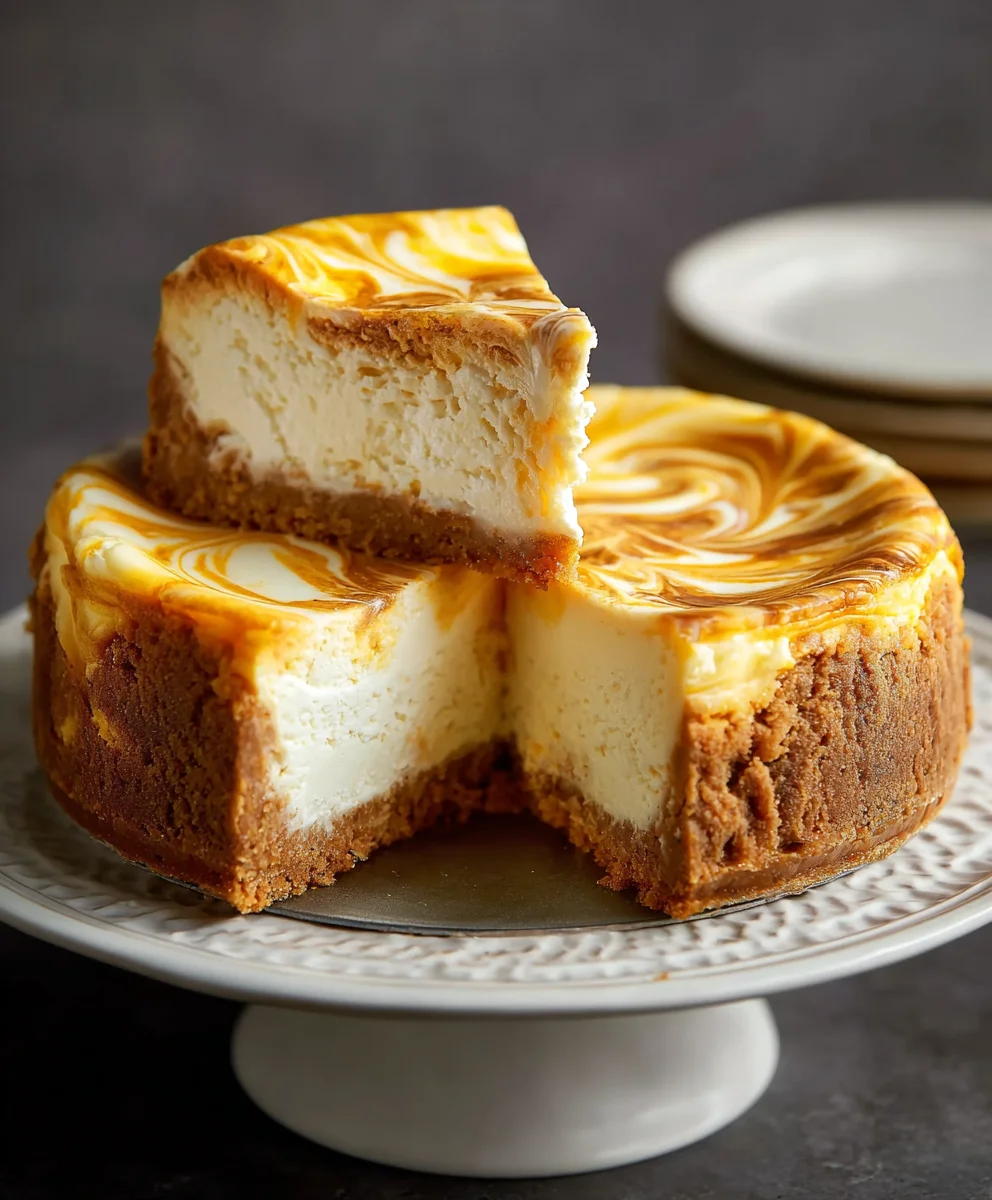
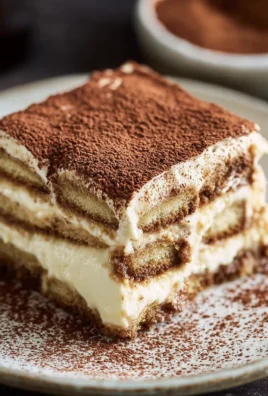
Cheesecake With Pumpkin Swirl is not just a dessert; it’s an edible masterpiece that promises to captivate both your eyes and your palate. Imagine the rich, velvety texture of classic cheesecake, beautifully contrasted with vibrant, spiced swirls of golden pumpkin, all nestled on a crisp graham cracker crust. This seasonal showstopper effortlessly blends two beloved dessert traditions into one extraordinary creation.
While cheesecake itself boasts a rich history dating back to ancient Greece, its modern variations, particularly those featuring seasonal produce, truly shine. The addition of pumpkin grounds this particular cheesecake firmly in the heart of autumn and holiday celebrations, making it a quintessential treat for gatherings like Thanksgiving. People adore this dish because it perfectly marries the creamy tang of traditional cheesecake with the warm, inviting spices of pumpkin pie. It’s the ultimate dessert for impressing guests, offering a sophisticated yet comforting experience that truly captures the essence of the season. Every luxurious slice of this Cheesecake With Pumpkin Swirl promises a symphony of flavors and textures, making it an unforgettable highlight for any occasion.

Ingredients:
- For the Crust:
- 1 ½ cups (about 180g or 20-22 sheets) graham cracker crumbs (or digestive biscuits, or gingersnap cookies for a spicy twist)
- ¼ cup (50g) granulated sugar
- ½ teaspoon ground cinnamon (optional, but highly recommended for warmth)
- 6 tablespoons (85g) unsalted butter, melted
- For the Cheesecake Filling:
- 32 ounces (900g) full-fat cream cheese, softened to room temperature (four 8-ounce blocks)
- 1 ½ cups (300g) granulated sugar
- ¼ cup (30g) all-purpose flour (or cornstarch, to help prevent cracks)
- 1 teaspoon pure vanilla extract
- ½ teaspoon salt
- 4 large eggs, room temperature
- ½ cup (120g) sour cream or full-fat plain Greek yogurt, room temperature (for added creaminess and tang)
- For the Pumpkin Swirl:
- ½ cup (120g) pumpkin puree (not pumpkin pie filling)
- ¼ cup (50g) granulated sugar
- 1 large egg yolk
- ½ teaspoon ground cinnamon
- ¼ teaspoon ground ginger
- ⅛ teaspoon ground nutmeg
- Pinch of ground cloves (optional, for deeper spice)
- 1 tablespoon (15ml) heavy cream or milk (to thin slightly if needed)
- Equipment You’ll Need:
- 9-inch springform pan
- Large roasting pan (for water bath)
- Aluminum foil (heavy-duty, for wrapping the springform pan)
- Electric mixer (stand mixer with paddle attachment or hand mixer)
- Rubber spatula
- Measuring cups and spoons
- Mixing bowls
Preparing the Crust
-
Preheat and Prepare Your Pan:
Preheat your oven to 325°F (160°C). Grab your 9-inch springform pan. This is crucial for easy removal of the cheesecake later. If you’re planning to use a water bath (which I highly recommend for a creamy, crack-free cheesecake), take a moment to meticulously wrap the outside of your springform pan with heavy-duty aluminum foil. I usually use two large sheets, crossing them over and pressing them firmly against the sides and bottom of the pan to create a watertight seal. This prevents any water from seeping into your crust and making it soggy during the baking process. A soggy crust is no one’s friend!
-
Make the Crumb Mixture:
In a medium-sized bowl, combine your graham cracker crumbs, granulated sugar, and optional ground cinnamon. Give it a good whisk or stir to ensure all the dry ingredients are evenly distributed. If you’re crushing your own graham crackers, a food processor works wonders for creating fine, uniform crumbs. The finer the crumbs, the more compact and stable your crust will be.
-
Add the Butter:
Pour the melted unsalted butter over the crumb mixture. Using a fork or your hands (which is often more effective for ensuring even distribution), mix everything together until the crumbs are thoroughly moistened and resemble wet sand. Every single crumb should be coated in butter; this is what binds your crust together into a sturdy foundation.
-
Press the Crust:
Transfer the buttered crumb mixture into the bottom of your prepared springform pan. Using the bottom of a flat glass or a measuring cup, firmly and evenly press the mixture into the bottom of the pan. You want a compact, even layer. You can also press a small amount of the mixture up the sides of the pan if you prefer a side crust, though for a cheesecake this rich, I often stick to just the bottom. A firm press is key to prevent crumbling when you slice it later.
-
Partial Bake (Optional but Recommended):
Place the pan with the pressed crust into the preheated oven and bake for 8-10 minutes. This step helps to set the crust, making it sturdier and less prone to becoming soggy once the wet filling is added. After baking, remove it from the oven and set it aside to cool while you prepare the filling. If you’re short on time, you can also just chill it for 15-20 minutes in the freezer, but I find the partial bake gives a better result.
Crafting the Velvety Cheesecake Filling
-
Prepare Your Ingredients:
Before you even touch your mixer, ensure all your cheesecake filling ingredients, especially the cream cheese, eggs, and sour cream, are at room temperature. This is absolutely critical for achieving a silky-smooth, lump-free batter. Cold ingredients will resist emulsifying properly, leading to a lumpy texture. I usually take them out of the fridge at least an hour, sometimes two, before I plan to start baking.
-
Cream the Cream Cheese:
In the bowl of your stand mixer fitted with the paddle attachment (or a large bowl using a hand mixer), place the softened cream cheese. Beat the cream cheese on medium speed for about 2-3 minutes, scraping down the sides of the bowl frequently. You want it to be incredibly smooth, light, and free of any lumps. This step is about aerating the cream cheese just slightly and ensuring its texture is perfectly even before anything else is added.
-
Add Sugar and Flour:
Reduce the mixer speed to low. Gradually add the granulated sugar to the cream cheese, followed by the all-purpose flour (or cornstarch). Continue mixing on low speed until just combined and smooth, scraping down the bowl as needed. The flour acts as a stabilizer, helping to prevent cracks in your cheesecake and giving it a slightly firmer texture. Do not overmix at this stage; we’re just incorporating the sugar.
-
Incorporate Vanilla and Salt:
Stir in the vanilla extract and salt. Mix on low speed for just about 30 seconds until fully incorporated. Vanilla adds that classic cheesecake flavor, and a touch of salt really brings out the sweetness and richness.
-
Add Eggs, One at a Time:
This is another crucial step for texture. Add the eggs one at a time, mixing on very low speed just until each egg is incorporated before adding the next. Scrape down the sides and bottom of the bowl after each addition. The key here is gentle mixing and not overmixing. Overmixing eggs introduces too much air into the batter, which can cause the cheesecake to puff up dramatically during baking and then collapse and crack as it cools. We want a dense, creamy texture, not a soufflé.
-
Fold in Sour Cream:
Finally, gently fold in the room temperature sour cream (or Greek yogurt) using a rubber spatula. Mix until just combined. The sour cream adds a wonderful tangy depth and extra creaminess to the cheesecake, making it truly irresistible. Again, be mindful not to overmix. Once it’s just incorporated, stop.
Creating the Aromatic Pumpkin Swirl
-
Combine Pumpkin Swirl Ingredients:
In a separate medium bowl, combine the pumpkin puree, granulated sugar, egg yolk, ground cinnamon, ground ginger, ground nutmeg, and optional pinch of ground cloves. The egg yolk helps the swirl set nicely within the cheesecake, and the spices are what give it that quintessential autumn flavor profile.
-
Whisk Until Smooth:
Whisk all the pumpkin swirl ingredients together vigorously until the mixture is completely smooth and uniform in color and consistency. If your pumpkin puree is particularly thick, or you want a slightly looser swirl, you can add 1 tablespoon of heavy cream or milk and whisk it in.
-
Set Aside:
Once smooth, set your pumpkin swirl mixture aside. It’s ready to be layered into the cheesecake.
Assembly, Baking, and Cooling
-
Prepare the Water Bath:
Before pouring your batter, set up your water bath. Boil a kettle of water. Place your foil-wrapped springform pan inside a larger roasting pan. Make sure the roasting pan is large enough to comfortably hold the springform without touching the sides too tightly, allowing for water circulation.
-
Pour the Cheesecake Batter:
Pour about two-thirds of the cheesecake filling over the cooled crust in your prepared springform pan. Gently tap the pan on your counter a few times to release any large air bubbles. This also helps to level the batter.
-
Add the Pumpkin Swirl:
Carefully dollop spoonfuls of the pumpkin swirl mixture over the cheesecake batter. Don’t worry about being too precise at this stage; rustic swirls are beautiful!
-
Top with Remaining Batter:
Gently pour the remaining one-third of the plain cheesecake batter over the pumpkin dollops. This will partially cover the pumpkin, allowing for a beautiful swirl effect.
-
Create the Swirl:
Now for the fun part! Take a butter knife or a skewer and gently drag it through the batter, creating swirls. You can go in figure-eights, zig-zags, or random patterns. Don’t overdo it, or you’ll completely blend the colors. A few deliberate swirls are all you need to create that gorgeous marbled effect. Once you’re happy with your swirl, gently tap the pan on the counter again.
-
The Water Bath Baking Process:
Carefully place the roasting pan with your cheesecake into the preheated 325°F (160°C) oven. Once it’s safely on the oven rack, pour the hot water from your kettle into the roasting pan, being very careful not to get any water into the cheesecake itself. The water should come up about halfway or two-thirds of the way up the sides of the springform pan.
Bake for 60-75 minutes. The cheesecake is done when the edges are set, but the center (about a 2-inch diameter) still jiggles slightly like a firm Jell-O when you gently nudge the pan. This slight jiggle is normal and desired! It will continue to set as it cools. -
Initial Cooling in Oven:
Once baked, turn off the oven, but leave the cheesecake inside with the oven door propped open a few inches (you can use a wooden spoon to keep it ajar). Let it cool in the gradually cooling oven for 1 hour. This slow cooling process is incredibly important as it helps prevent cracking due to sudden temperature changes.
-
Cooling to Room Temperature:
After 1 hour in the oven, carefully remove the roasting pan from the oven. Carefully lift the springform pan out of the water bath (discard the water). Remove the aluminum foil from around the springform pan. Place the cheesecake on a wire rack and let it cool completely to room temperature, which can take another 2-3 hours. You’ll notice the center will firm up nicely as it cools.
The Essential Chilling Phase
-
The Importance of Chilling:
Once your Cheesecake With Pumpkin Swirl has reached room temperature, it’s time for the most crucial step: chilling. Cover the cheesecake loosely with plastic wrap (don’t let the wrap touch the surface if possible, to avoid condensation). Transfer it to the refrigerator and chill for a minimum of 6-8 hours, but preferably overnight. This long chilling period allows the cheesecake to fully set, develop its rich flavor, and achieve that iconic dense, creamy texture. Trying to slice it too early will result in a messy, unset cheesecake.
-
Serving Your Masterpiece:
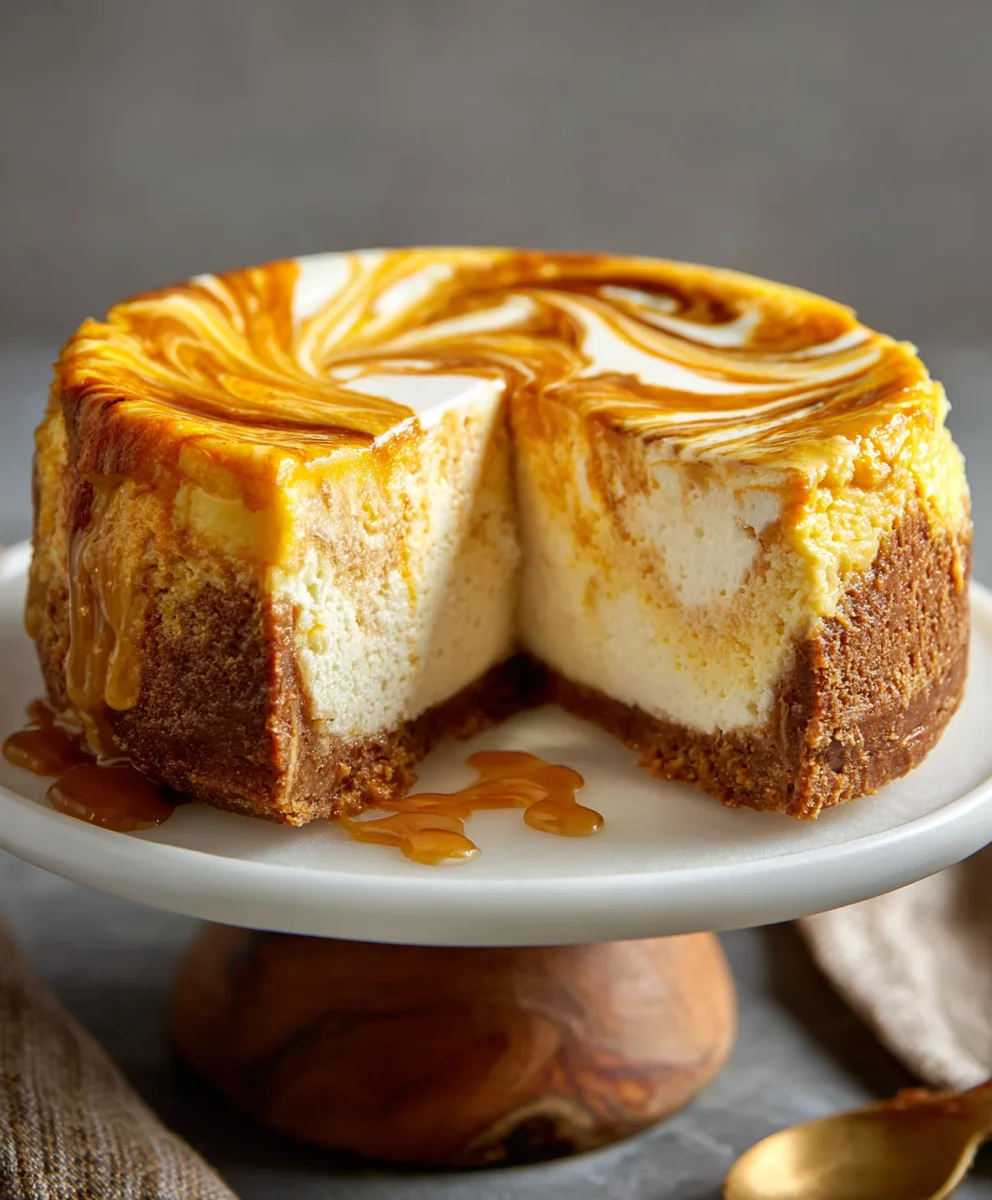
When ready to serve, carefully run a thin knife around the edge of the cheesecake before releasing the springform collar. This prevents the cheesecake from sticking to the sides and ensures a clean release. Slice the cheesecake using a sharp, thin knife, cleaning the knife with a warm, damp cloth between each slice for the cleanest cuts. You can serve it plain, or with a dollop of whipped cream, a sprinkle of cinnamon, or a drizzle of caramel sauce. Enjoy your perfectly crafted Cheesecake With Pumpkin Swirl!
-
Storage:
Leftovers, if there are any, can be stored in an airtight container in the refrigerator for up to 5 days. For longer storage, slices can be individually wrapped and frozen for up to 1 month; thaw in the refrigerator before serving.
Conclusion:
Well, my friends, we’ve reached the sweet finale of our culinary journey, and I genuinely hope you’re feeling as excited as I am about this incredible dessert. What truly makes this recipe an absolute triumph and a non-negotiable addition to your baking repertoire is its exquisite balance. We’re talking about the dreamiest, creamiest cheesecake base you could ever imagine, perfectly complemented by the warm, aromatic embrace of a vibrant pumpkin swirl. It’s more than just a dessert; it’s an experience, a delightful fusion that captures the essence of comfort and celebration in every single bite. The visual appeal alone, with those gorgeous streaks of orange against the pale cream, is enough to make anyone’s jaw drop, making it an ideal showstopper for any gathering, big or small. Trust me, once you taste that velvety texture combined with the subtle spice, you’ll understand exactly why this particular treat stands head and shoulders above the rest. It’s surprisingly straightforward to achieve such a professional-looking and tasting dessert, proving that you don’t need to be a pastry chef to create something truly spectacular that will impress everyone at your table.
This isn’t just any pumpkin dessert; it’s a masterpiece that marries the timeless elegance of classic cheesecake with the comforting, inviting flavors of autumn. The subtle spices in the pumpkin swirl – cinnamon, nutmeg, a hint of ginger – don’t overpower the rich tang of the cream cheese but rather elevate it, creating a symphony of tastes that dance on your palate. Every forkful offers a delightful contrast, from the crumbly, buttery graham cracker crust to the silken body of the cheesecake, culminating in that beautiful, spiced pumpkin ribbon. It’s comforting yet sophisticated, familiar yet exciting. If you’ve ever wanted to truly capture the magic of a season in dessert form, this is your golden ticket. The way the flavors meld together is simply unparalleled, making a strong case for why it should be your go-to recipe for potlucks, holiday dinners, or even just a luxurious weekend treat. It really is the ultimate Cheesecake With Pumpkin Swirl, designed to delight and impress from the first glimpse to the very last, lingering taste. This recipe promises not just a dessert, but a cherished memory in the making, a culinary high point that guests will talk about long after the last crumb is gone.
Now, let’s talk about how to make this already incredible dessert even more tailored to your tastes! While this cheesecake is absolutely divine on its own, there are so many wonderful ways to serve and enjoy it. For a simple yet elegant touch, I love adding a generous dollop of freshly whipped cream, perhaps lightly sweetened with a touch of vanilla extract, and a delicate dusting of cinnamon or freshly grated nutmeg right before serving. If you’re feeling a little more adventurous, consider drizzling a warm caramel sauce over each slice, or even a rich chocolate ganache – the combination of pumpkin, cheesecake, and chocolate is unexpectedly brilliant. For a brighter, fruitier contrast, a homemade berry compote, slightly warmed, can cut through the richness beautifully, adding another layer of complexity. Don’t forget about texture! A sprinkle of toasted pecans, candied walnuts, or even a crumbling of ginger snaps on top can add a delightful crunch. And for those who love to experiment, imagine swapping out the graham cracker crust for a gingersnap or chocolate cookie crust for a different flavor profile. You could also infuse your pumpkin swirl with a tiny splash of bourbon or rum for an adult twist, or even create individual mini cheesecakes for portion control and adorable presentation. The possibilities are truly endless, allowing you to personalize this magnificent creation to your heart’s content, making it uniquely yours every single time you bake it.
So, what are you waiting for? I sincerely hope that by now you’re convinced and ready to roll up your sleeves and bring this fantastic recipe to life in your own kitchen. You truly deserve to experience the joy of creating something so utterly delicious and beautiful. Don’t be intimidated by its stunning appearance; I promise you, the process is rewarding and the results are more than worth every moment. This isn’t just a recipe; it’s an invitation to create a moment, to share warmth, and to impress your loved ones with a dessert that tastes like pure bliss.
Don’t wait any longer to try this magnificent recipe!
Once you’ve baked your very own, I would absolutely love to hear about your experience! Please, don’t hesitate to share your thoughts, your successes, and especially your beautiful photos with me and our community. What did you love most about it? Did you try any exciting variations? Your feedback and creations inspire us all. Go forth, bake this extraordinary Cheesecake With Pumpkin Swirl, and prepare to bask in the admiration of everyone who takes a bite. Happy baking!
Irresistible Cheesecake With Pumpkin Swirl – Easy Recipe!
Cheesecake With Pumpkin Swirl is an edible masterpiece. Imagine the rich, velvety texture of classic cheesecake, beautifully contrasted with vibrant, spiced swirls of golden pumpkin, all nestled on a crisp graham cracker crust. This seasonal showstopper blends two beloved dessert traditions into one extraordinary creation.
Ingredients
-
1 ½ cups graham cracker crumbs (or digestive biscuits, finely crushed)
-
¼ cup granulated sugar
-
½ tsp ground cinnamon (optional)
-
6 tbsp unsalted butter, melted
-
3 packages (8 oz each) cream cheese, softened (24 oz total)
-
1 cup granulated sugar
-
¼ cup all-purpose flour (or cornstarch)
-
1 tsp pure vanilla extract
-
½ tsp salt
-
4 large eggs, room temperature
-
½ cup sour cream or full-fat plain Greek yogurt, room temperature
-
½ cup pumpkin puree (not pie filling)
-
¼ cup granulated sugar
-
1 large egg yolk
-
½ tsp ground cinnamon
-
¼ tsp ground ginger
-
⅛ tsp ground nutmeg
-
Pinch ground cloves (optional)
-
1 tbsp heavy cream or milk (optional, to thin)
Instructions
-
Step 1
Preheat oven to 325°F (160°C). Wrap a 9-inch springform pan with heavy-duty foil for a water bath. -
Step 2
Combine graham cracker crumbs, ¼ cup sugar, and optional cinnamon. Mix with 6 tbsp melted butter until crumbs are fully moistened. -
Step 3
Press crumb mixture firmly into the bottom of the prepared pan. Bake for 8-10 minutes, then cool. -
Step 4
Ensure all cheesecake filling ingredients are at room temperature. Beat softened cream cheese on medium speed for 2-3 minutes until smooth. -
Step 5
On low speed, gradually add 1 cup sugar and ¼ cup flour (or cornstarch) to cream cheese, mixing until just combined. -
Step 6
Stir in vanilla extract and salt. Add eggs one at a time on very low speed, mixing just until each is incorporated. Do not overmix. -
Step 7
Gently fold in room temperature sour cream (or Greek yogurt) with a spatula until just combined. -
Step 8
In a separate bowl, combine pumpkin puree, ¼ cup sugar, egg yolk, cinnamon, ginger, nutmeg, and optional cloves. Whisk until smooth; add 1 tbsp heavy cream or milk if needed. -
Step 9
Place foil-wrapped springform pan in a large roasting pan. Pour two-thirds of the cheesecake filling over the cooled crust. Dollop pumpkin swirl mixture over the plain batter, then gently pour remaining plain batter on top. -
Step 10
Use a knife or skewer to gently create swirls through the batter. Tap pan to settle. -
Step 11
Carefully place roasting pan with cheesecake in the preheated 325°F (160°C) oven. Pour hot water into the roasting pan (halfway up springform sides). Bake for 60-75 minutes until edges are set and center slightly jiggles. -
Step 12
Turn off oven, prop door open, and let cheesecake cool in the oven for 1 hour. -
Step 13
Remove from water bath, discard foil. Place on a wire rack and cool completely to room temperature (2-3 hours). -
Step 14
Cover loosely and chill in the refrigerator for a minimum of 6-8 hours, preferably overnight, until fully set. -
Step 15
Run a thin knife around the edge before releasing the springform collar. Slice with a sharp, warm, damp knife and serve. Store leftovers in refrigerator for up to 5 days, or freeze for up to 1 month.
Important Information
Nutrition Facts (Per Serving)
It is important to consider this information as approximate and not to use it as definitive health advice.
Allergy Information
Please check ingredients for potential allergens and consult a health professional if in doubt.
Leave a Comment